Aircon 24000 Btu Mini Split Blue Ii Installation Guide
Ductless mini splits are one of the most popular AC choices for homeowners and businesses alike. We sell tons of mini split air conditioners each day on our website, and, on our blog, have previously written about all the benefits of and features to consider when purchasing a mini-split AC of your own.
Installing ductless mini splits requires a high level of electrical knowledge for the job to be done safely and without harm to yourself or the unit. For that reason, we do not recommend homeowners try to install the unit themselves. Unless you are an advanced DIYer with extensive experience in electrical work, we strongly advise you to hire a professional to get the job done.
But even professionals have to learn the ropes, and so if you are an electrician who simply has not undertaken a mini split installation project before, this post is for you. Here, we offer a step-by-step guide to everything you need to know about the electrical specifications for installing ductless mini splits.
NOTE: These instructions are in regards to electrical specifications only, and do not include line set installation or refrigerant set-up.
How to Wire a Mini Split System
Before we take you through the steps on wiring a mini split system, we're going to clarify some common questions about your mini split wiring.
1. What size wire do I need for a mini split?
For most ductless mini-splits, the right wire is a 14/4 stranded conductor cable. Mini-split wires are used to connect the outdoor compressor unit with the indoor evaporator unit, delivering electricity and control signals.
A 14/4 stranded cable provides two 14-gauge conductor wires for power, one communication wire and one ground wire. The ground wire is essential for safe operation, preventing damage to the air conditioner and protecting your family, which is why going with 14/4 is always better than 14/3.
2. When do I use a 10/2 or 10/3 for mini splits?
When installing a mini-split air conditioner, it's vital to choose cable that's large enough to handle the current your system requires. For ample spaces and significant heating/cooling, some homeowners choose a mini-split with 36,000 BTU capacity. This type of system can require a 30-amp circuit, so you would need 10-guage wire to handle the current. Every unit will list its amp draw and the wire choice will vary based on that.
What do 10/2 and 10/3 wire numbers mean? The first number is the thickness in AWG (American wire gauge). Don't forget that in AWG, smaller numbers mean thicker wires. So a 14-gauge wire is medium sized, 12-gauge would be a little bigger, and 10-gauge is the biggest wire you're probably going to need for a mini-split.
The second number is the amount of connectors the wire has. A 10/2 wire has two connectors, the black and white, both hot/lead wires as well as a ground wire. On the other hand, 10/3 wires have three connectors, black, white and red plus a ground wire.
For additional guidance, check out: Wire Size Guide: What Size Wire Do I Need?
With any electrical project, be sure to check with a licensed electrician and verify the requirements of your local codes.
Now that we have that clarified, follow these steps to wire up your ductless mini split system:
Step 1 – Mini-Split Shut-Off Box:
Run a 230/208 volt or 115 volts* dedicated line from the main break box to the area where the shut-off box will be installed next to the unit.
* Voltage depends on the system. The vast majority of mini-split units are 230/208V, but some are 115V.
Step 2 – Mini-Split Wiring:
Mount the shut-off box on the outside wall and connect the wires from the break box.
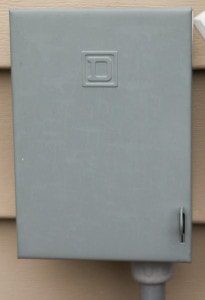
To meet the code, you must have a shut-off box at the location of the unit. This makes system repairs safer and easier. Wire the two hot leads to the fused connections in the box and the ground to the provided connection. Then, reattach the faceplate and insert the on/off switch. It should be kept in the off position while you continue to work on the unit.
Step 3 – Electrical Wire Whip:
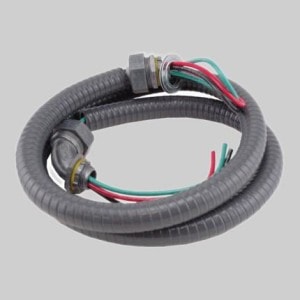
An electrical whip is a premade, outdoor grade wire set that is intended to run from a shutoff box to the unit being installed. Using this ensures that you will have no issues with meeting code and keeps the process simple for you. The whip must be wired into the shutoff box and then to the unit as we will talk about next.
Alternatively, run your own wire through an outdoor grade conduit so that is protected from the elements. (an electrical whip is simply a pre-done version of this.)
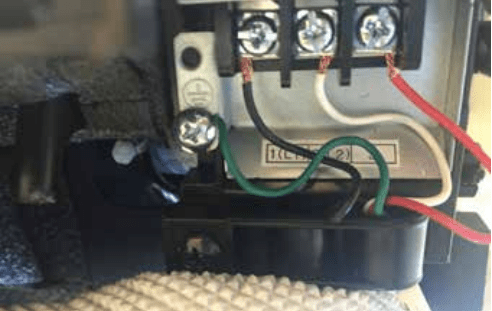
Step 4 – Mini-Split Wire Connection to Base:
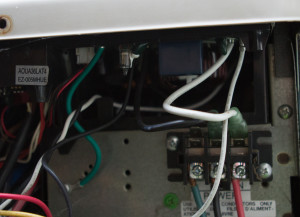
While it might be difficult to see through the other wiring in the unit, here we have included a picture of the main power connections to a Friedrich Mini Split Unit. You can see the green, black, and red wires connect the terminal blocks on the bottom right. The exact details of a connection like this are specific to your unit. Always reference the instruction manual before attempting any electrical connections.

Step 5 – Mini-Split Wiring Connecting Inside to Outside Unit:
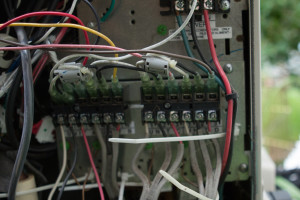
Depending on whether you are installing a single zone or a multi-zone unit , you will have a different number of connections. This Friedrich multi-zone unit has connections for 4 units, all of which are numbered for easy cross-referencing to the indoor unit. Make sure to write down which wire color is connected to which number. It is also critical to make sure that each indoor unit on a multi-zone system is wired to the same input that its line set is connected to. Otherwise, the system will not operate correctly.
It is recommended to use 14 gauge stranded wire for installation. Pictured is a 14 gauge solid wire which will work but should only be used if the stranded wire is unavailable. Total Home Supply offer Honeywell 14/4 Mini Split wire in 50 ft and 250 ft rolls .
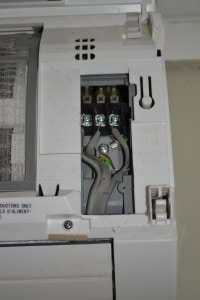
Step 6 – Mini-Split Installation Complete:
Just like the outdoor unit, the indoor connections must be made in the correct order. Connect the 3 main wires along with the ground to their respective terminals. Some manufacturers recommend using round crimp style terminals for a more secure connection.
After this, the electrical portion of the installation is done! Congratulations!
From figuring out the difference between 10/2 or 10/3 wires to the nitty-gritty of the wiring and installation of your mini split, we hope to have resolved your electrical wiring concerns.
If you have any further questions regarding the electrical specifications of installing ductless mini splits, please do not hesitate to contact us at 1-877-847-0050 and speak to one of our qualified representatives.
Ready for the next step? Check out our multi zone mini split buying guide!
Learn More About Mini Splits:
Ductless Mini Split AC Installation: How to Install, DIY + Placement
Ductless Mini Split Sizing Guide: Heat Load & BTU Calculator
Mini Split Failures, Problems & Troubleshooting Guide
Source: https://blog.totalhomesupply.com/electrical-specs-for-installing-ductless-mini-splits/
Post a Comment for "Aircon 24000 Btu Mini Split Blue Ii Installation Guide"